Create a ball
In this article, you create a custom UserControl element using an external library. It is the best way to reuse this custom UserControl element in future projects.
Prerequisites
This article builds on the previous one, Create your Windows Forms project. If you have not read that article, go through that one first.
Create an external library
-
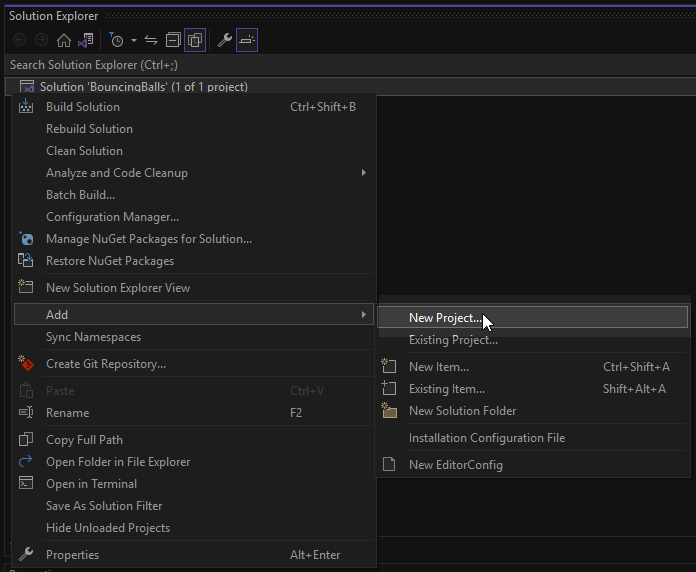
On the solution in Solution Explorer, right-click in the right part of the Visual Studio and select Add > New Project.

-
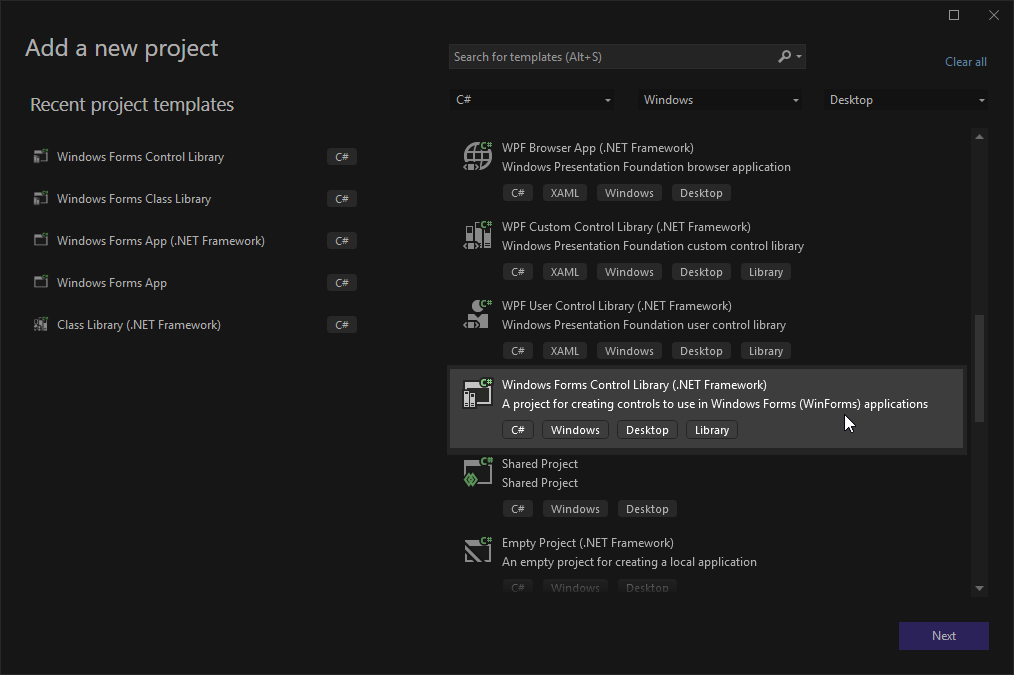
On the Add a new project page, choose C# in the All languages list, Windows in the All platforms list, and Desktop in the All project types list. Select the Windows Forms Control Library (.NET Framework) template, and then click Next.

-
On the Configure your new project page, enter the Ball in the Project name box and then click Next.
-
On the Additional information page, select the .NET 6 (Long-term support), and then click Create.
-
Visual Studio creates the Ball library inside of the app. This library is located in Solution Explorer. By default, you can see the UserControl form on Visual Studio.
-
Rename the main .cs file to the Ball.cs in the Solution Explorer.
-
Double-click PictureBox in the Toolbox or drag it to the form. Move the control to the upper-left corner of the form. Resize the form to the PictureBox size.
If you cannot see the Ball element in the Toolbox then add the UserControl item to the Toolbox.
-
Right-click anywhere on the Toolbox and select Choose item ....
-
On the Choose Toolbox Items window, select the UserControl checkbox located in the .NET Framework Components tab, and click OK.
Draw a ball
-
In your Visual Studio project, select the Ball Forms Designer.
-
On the menu bar, select View > Code or right-click anywhere on the form and select View Code. File ball.cs appears so that you can view the code behind the form. You can also use F7 to open the code.
-
You can see the code generated by default with Visual Studio.
using System; using System.Collections.Generic; using System.ComponentModel; using System.Drawing; using System.Data; using System.Linq; using System.Text; using System.Threading.Tasks; using System.Windows.Forms; namespace BouncingBalls { public partial class Ball: UserControl { public Ball() { InitializeComponent(); } } } -
Add
System.Drawing.Drawing2D;namespace into the list using theusingdirective and change the namespace to the Bouncing_Balls. This is the same namespace that the main form Form1.cs uses. -
Add the following code to draw a circle. Place this code sample into the
Ball()class right after theInitializeComponent();method.In this code sample, the GraphicsPath class creates the connected lines, and you can use them as a circle. The AddEllipse method adds an ellipse to the current path, which uses coordinates and circle parameters. The variablepublic Ball() { InitializeComponent(); //Create a ball and assign to the ball the pictureBox1 element GraphicsPath path = new GraphicsPath(); path.AddEllipse(0, 0, 50, 50); Region rgn = new Region(path); pictureBox1.Region = rgn; }rgnof the Region class defines a new region for the circle which is pictureBox1. -
Add the following code to define the color of the ball. Place this code sample right after the previous class.
In this code sample, the Color class represents the color of the ball. Then OnPaint method paints the ball color using the ForeColor property of the ball.//Specify the color of balls using the ForeColor parameter public Color FigureColor { get; set; } protected override void OnPaint(PaintEventArgs e) { pictureBox1.BackColor = ForeColor; base.OnPaint(e); } -
In this step, you can see the following code in the ball.cs file.
   using System;
   using System.Collections.Generic;
   using System.ComponentModel;
   using System.Drawing;
   using System.Drawing.Drawing2D;
   using System.Data;
   using System.Linq;
   using System.Text;
   using System.Threading.Tasks;
   using System.Windows.Forms;

   namespace Ball
   {
       public partial class Ball : UserControl
       {
           //Create a ball and assign to the ball the pictureBox1 element
           public Ball()
           {
               InitializeComponent();
               GraphicsPath path = new GraphicsPath();
               path.AddEllipse(0, 0, 50, 50);
               Region rgn = new Region(path);
               pictureBox1.Region = rgn;
           }
           //Specify the color of balls using the ForeColor parameter
           public Color FigureColor { get; set; }
           protected override void OnPaint(PaintEventArgs e)
           {
               pictureBox1.BackColor = ForeColor;
               base.OnPaint(e);
           }
       }
   }
Add the Ball library to the Toolbox of the form
Now you need to add the dependencies of the Ball library to your project.
-
Build the Ball library before adding the dependency into the app. Select Build > Build Ball or press Ctrl + B.
-
Select the Bouncing balls References category in the Solution Explorer of your app, right-click, and select Add Reference.
-
Select the Projects category, check the Ball, and click OK.
-
Go to the design file of the form and you can see the Ball element in the Toolbox.
Run your app
In this step, you can run your app and check if everything is good.
- Press Ctrl + Shift + S or click the icon to save all files in the project.
- Press F5 or click the icon to run your project.