Add balls to the form
In this article, you add two balls to the form using the Form Design window and write a code for bouncing balls using Form1.cs file. In this step, you need to use Form1.cs file to write the code.
Prerequisites
This article builds on the previous one, Make the ball move. If you haven't read that article, go through that one first.
Add the timer to the form
-
In your Visual Studio project, select Form1 Forms Designer.
-
In the Toolbox, double-click Timer in the Toolbox or drag it to the form. Timer** usually locates below the form.
-
Select the Timer and double-click it. Visual Studio opens Form1.cs, and you can view the code behind the form.
Create the ball list
-
After adding the Timer, you can see the code generated by default with Visual Studio.
using System; using System.Collections.Generic; using System.ComponentModel; using System.Data; using System.Drawing; using System.Linq; using System.Text; using System.Threading.Tasks; using System.Windows.Forms; namespace WindowsFormsApp10 { public partial class Form1 : Form { public Form1() { InitializeComponent(); } private void timer1_Tick(object sender, EventArgs e) { } } } -
Add the following code to add the ball list. In this game, you use two balls. In other games or apps, you can use the ball library and add as many balls as you need.
In this code sample, List//Add the ball list and create the method that returns the balls from the list private List<ball> balls; private List<ball> GetAllBalls() { CreateOrInitBall("Ball1", listBox1, label1, numericUpDown1, panel1, ball1); CreateOrInitBall("Ball2", listBox2, label2, numericUpDown2, panel2, ball2); return new List<ball> { ball1, ball2 }; }ballsstores objects from theballclass.The
GetAllBallsmethod invokes theCreateOrInitBallmethod that we will add later. Also, theGetAllBallsmethod returns the balls from the list, which were added on the previous step using the Form1 Forms Designer. -
Add the following code to initialize the ball list.
-
Add the following code to connect the balls with the speed counter and text field with statistics.
   //Create the method that accepts the control elements as balls parameters
   //and sets a dependency between the ball position and the control elements
   private void CreateOrInitBall(string name, ListBox listbox, Label output, NumericUpDown num, Panel parent, Ball ball = null)
   {
       var currentBall = ball ?? new Ball();
       currentBall.Name = name;

       if (ball == null)
       {
           parent.Controls.Add(currentBall);
       }

       num.ValueChanged += (sender, e) =>
       {
           currentBall.Speed = (int)(sender as NumericUpDown).Value;
       };

       currentBall.OnCollision += (oldX, oldY, newX, newY) =>
       {
           output.Text = $"#{currentBall.Name}: {currentBall.Counter} collisions";
           listbox.Items.Add($"{DateTime.Now.ToString("HH:mm:ss")} {oldX}{oldY} => {newX}{newY}");
       };
   }
In this code sample, the
CreateOrInitBallmethod uses the following controls:- ListBox for the changing direction statistics.
- Label for the collision number.
- NumericUpDown for the speed increasing/decreasing.
- Panel as ball territory.
Add the timer code
Add the following code to the timer1_Tick method.
   private void timer1_Tick(object sender, EventArgs e)
        {
            //Update the position of each ball
            int total = 0;
            total++;
            balls.ForEach(y => y.UpdatePosition());
        }
Add the balls to the form
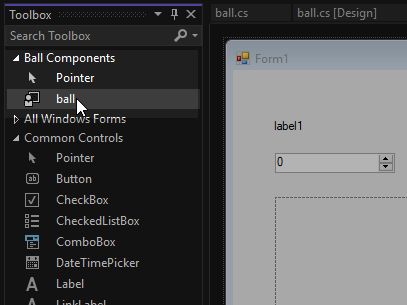
- In the Toolbox, select the ball element and drag it to
panel1.
- Drug again the ball element to
panel2. - The
ball1andball2locate inpanel1andpanel2correspondingly. - Set preferred colors to these balls using the ForeColor of the Properties.
Run your app
In this step, you can run your app and check if everything is good.
- Press Ctrl + Shift + S or click the icon to save all files in the project.
- Press F5 or click the icon to run your project.